Github Actions
Small post on utilizing Github’s new CI tool, Github Actions.
Github has recently made their CI platform, Github Actions publically available. I came upon it researching CI tools for a school project I was doing where I was building a computer vision model that could be deployed to the Amazon Deep Lens. I needed a way to zip up my AWS Lambda function and re-deploy it when I made changes so that I didn’t have to manually do it every time. I looked into setting up Jenkins, but it seemed a little too cumbersome for my use case.
Workflows
Github actions are similar to other tools out there (Gitlab pipelines, Bitbucket pipelines, etc.), and they’re extremely easy to setup. The nice thing about them is that you can create an action and reuse it for future projects. The yaml file that orchestrates the workflow sits in a folder of your repo titled .github/workflows/. Within the file you define jobs that you want the pipeline to perform. Here are the first few lines from my AWS Lambda pipeline.
name: Update Lambda Function

on:
    push:
        branches:
            - master
This tells the pipeline to run whenever I push a change to my master branch. After we designate this step, we can start building the actual pipeline.
AWS requires that you use credentials to login through the command line in the format of a config file that looks like this:
[default]
aws_access_key_id=your_key_id
aws_secret_access_key=your_secret_access_key
The default piece just designates these as the default credentials for accessing AWS resources. Since we don’t want to commit credentials to our repo, I’ve added the config file to the .gitignore. We’ll write a small shell script that can be executed in our pipeline to access our credentials. First, we encrypt the config file using the following gpg command.
gpg --symmetric --cipher-algo AES256 config
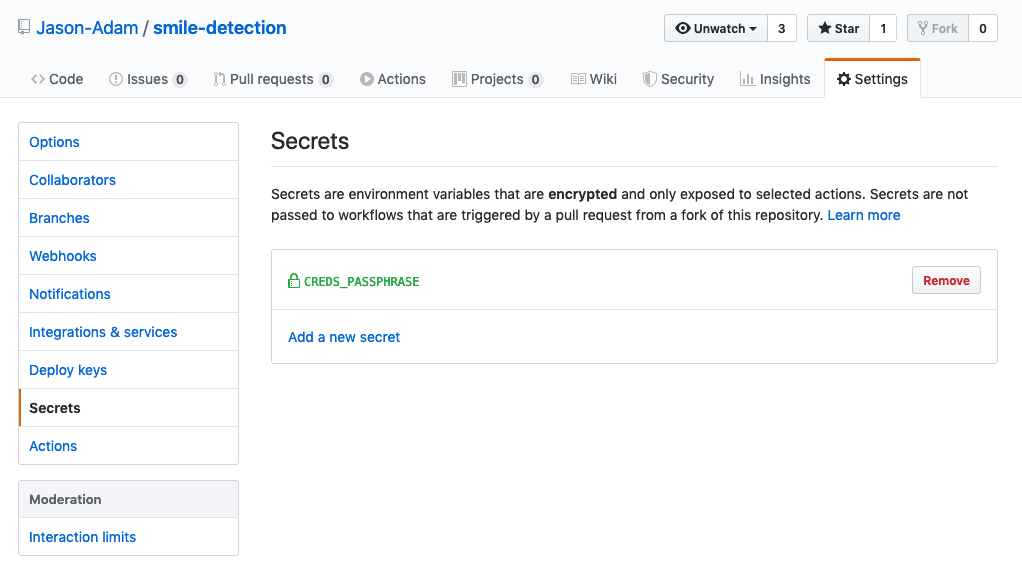
After entering this, you’ll be prompted to enter a secret passphrase that will be needed to decrypt the file. Take this passphrase and enter it in the settings of your repo like below.

Once you’ve entered the passphrase, you need to create a script that will decrypt it in the pipeline. The following shell script will utilize the repo secret to decrypt the config.gpg file and make the credentials accessible for future steps.
#!/bin/sh
# Decrypt the creds.json file

# Create directory for secrets
mkdir "$HOME/.aws"

# Decrypt the file using repo variable
gpg --quiet \
    --batch \
    --yes \
    --decrypt \
    --passphrase="$CREDS_PASSPHRASE" \
    --output "$HOME/.aws/config" config.gpg
The AWS cli tools expect the config file to be in the home directory under .aws/config so our final step outputs the file there. You can see in the script that we access the pipeline variable CREDS_PASSPHRASE that we created in the prior step. Once this step runs, our AWS credentials will be ready to use for interacting with AWS through it’s CLI. Before committing the script to your repo, you must make it executable by running the following command.
chmod +x decrypt_secret
The full step for decrypting the secrets looks like this.
name: Update Lambda Function

on:
  push:
    branches:
      - master

jobs:
  primary:
    runs-on: ubuntu-latest
    steps:
      - uses: actions/checkout@v1
      - name: decrypt config
        run: ./decrypt_secret.sh
        env:
          CREDS_PASSPHRASE: ${{ secrets.CREDS_PASSPHRASE }}
AWS Lambda
Now that we’ve got our AWS credentials securely into our pipeline, let’s install the AWS CLI. The following commands can be entered as the next step in the pipeline to pull down the CLI tools.
curl "https://s3.amazonaws.com/aws-cli/awscli-bundle.zip" -o "awscli-bundle.zip"
unzip awscli-bundle.zip
./awscli-bundle/install -b ~/bin/aws
In the pipeline step, we can use the run: | command and put each step on a separate line. The | symbol indicates that the lines are separate commands. Our next command is to zip up our Lambda function. AWS requires your Lambda code be uploaded as a zip file if it’s made up of more than one file (i.e. your function has dependencies). Below is how we zip it up.
cd deeplens-smile-inferer
zip -r deeplens_smile_inferer.zip .
Our final step consists of publishing this lambda to our AWS account as a new version. We use the run: > command to extend a single command line function to multiple lines for easier reading.
run: >
  aws lambda update-function-code
  --function-name arn:aws:lambda:us-east-1:880540780340:function:deeplens-smile-inferer
  --zip-file fileb://deeplens-smile-inferer/deeplens_smile_inferer.zip
  --publish
And that’s it! We’ve successfully set up a github actions pipeline to publish a new version of our lambda function every time we push a change to our master branch! Here’s the full yaml for a complete view.
name: Update Lambda Function

on:
  push:
    branches:
      - master

jobs:
  primary:
    runs-on: ubuntu-latest
    steps:
      - uses: actions/checkout@v1
      - name: decrypt config
        run: ./decrypt_secret.sh
        env:
          CREDS_PASSPHRASE: ${{ secrets.CREDS_PASSPHRASE }}
      - name: install-cli
        run : |
          curl "https://s3.amazonaws.com/aws-cli/awscli-bundle.zip" -o "awscli-bundle.zip"
          unzip awscli-bundle.zip
          ./awscli-bundle/install -b ~/bin/aws
      - name: zip-lambda
        run: |
          cd deeplens-smile-inferer
          zip -r deeplens_smile_inferer.zip .
      - name: upload-new-lambda
        run: >
          aws lambda update-function-code
          --function-name arn:aws:lambda:us-east-1:880540780340:function:deeplens-smile-inferer
          --zip-file fileb://deeplens-smile-inferer/deeplens_smile_inferer.zip
          --publish
Recap
The github actions pipelines can be used for a wide number of things. This is just a basic example, but it can be extended rather easily to build docker images, re-deploy kubernetes pods, etc. Take advantage of this free tool offered by github to automate portions of your projects so you can spend more time solving problems.